
Geez. I always start out trying to follow instructions, but somewhere I veer off into my own world. For example, I was given a challenge to create my idea of a perfect neighborhood using an altered book or chipboard house shapes, like this awesome example by one of my artist friends:
Here's mine:
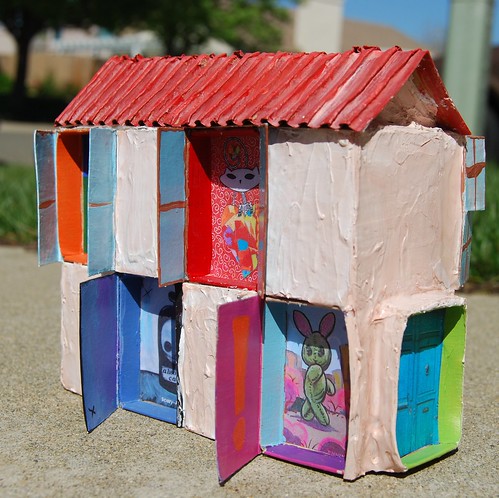
(pssst! I did a tutorial on how to make this here.)
I think my Mother would be proud to know that I've finally given up on following the rules at all costs (I was a very serious child).
This line of thinking got me off onto yet another tangent: A lot of people think some crafters can actually attain creative perfection somehow (yes, people have actually told me they think I don't screw pieces up). Trust me, I've screwed up PLENTY of stuff. Not only do I make gargantuan messessss, but the back of my art quilts (before I put the backing on) look a lot like thread vomit.

So I figured that if I can admit that the ankle tattoo on this quilt was a cover-up (ink from the shoes ran onto the leg during the final pressing), then YOU, my friends, can tell me a secret or two.
So tell me either:
- What colossal errors have you made?? What did you learn from it, how did you recover and if you successfully covered it up, how?
- What "rules" (like "never knot on the back of your embroidery") do you break and why?
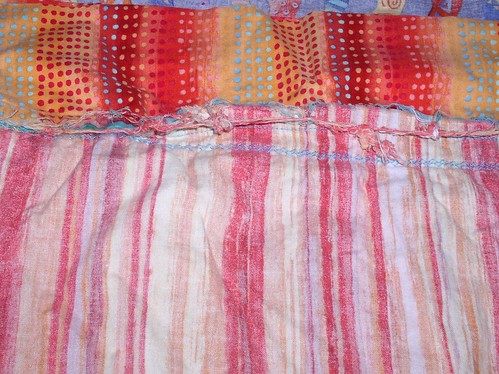
- Show off your "backside" - you know, the dark underbelly of your arts and crafts, such as the messy and unfinished "inside" of this pillowcase (my very first sewing project):
- the knowledge that you've empowered and liberated a fellow crafter by admitting what you do "wrong"
- the relief that comes with letting go of dirty little secrets AND
- an opportunity to win a set of six hand embellished note cards!
Oh, and be honest! Let's see what we can learn from each other!
Be crafty,
Krissi
OMG I have so many "happy accidents" that make my work what it is.
ReplyDelete1)When I originally painted the cheeks on sinister sleeves, I painted solid circles, decided I hated them and tried to wipe them off. Fortunately for me the outer rings had dried and couldn't be wiped off. Turns out I found a way to paint the cheeks the way I liked through that mistake. I started using the wipe away technique to antique future work as well. http://c2.ac-images.myspacecdn.com/images01/126/l_a5a24011094dbbdf94731e445208c9c5.jpg
2)Broken things are the best! I've accidently broken, fingers, necks, arms, etc, only to find that they look better broken. This piece being one example: http://c2.ac-images.myspacecdn.com/images01/119/l_e5629a3ef2c327e6f8937c626a84e255.jpg
Hmmmm..... let's see....
ReplyDelete1. In my scrapbooking, I no longer give a damn if something is "acid free" or not. I realized that your skin has acid, so unless you wear rubber gloves from start to finish, you are getting acid on them anyway. Tiny amounts, yes, but that's probably all that's in some of the cool non-acid-free embellishments that I use on my pages, too! And I no longer have to shop with that rule in mind... I can get papers and things that are lovely without worrying about acid. When I have papers that i know are not acid free, I just use protective sleeves for the photos, or, I use a copy of a photo rather than the original.
2. Card making... rubber stamping in general.... when I accidentally smudge ink somewhere on the card, it becomes part of the design. I either find a stamp that goes over it, or, I make the same smudge 5 or 6 times to look like a "background".
3. The "rules" on jewelry making seem to call for making eye pins with dangles on them, then using a jump ring to wire the dangle on to the finished piece. I don't do that, I make my eye pins big enough from the start that I can wire them directly on to the chain. Saves a step, saves a jump ring, and looks just as good!
Brenda Wells
drbrendawells@gmail.com
Oh THAT backside!
ReplyDeletewait. there are rules? whut? me thinks i've broke them all. here's one. once when i was 5 i had to paint the flag of the united states. it started out good but then my red paint went where the white paint was. so i made one big fat red stripe to go with the other eleven stripes. and my teacher had the nerve to shake her head at me. i guess from that point on i said fuck it, and i've been happily living without rules ever since.
ReplyDeleteHi Krissi,
ReplyDeleteI make little, tiny collages on dominoes and turn them into necklaces and pins. Usually I plan whether or not they are going to be a necklace in advance and pre drill the domino. Occasionally, I realize a one that I thought would be a good pin would be better as a necklace. Well...the drill bit gets really hot when you are drilling through a hardwood domino, sometimes so hot the decopage medium will blister. I can cover that with Diamond Glaze. Once, I drilled it after I already glazed it (BIG OOPS). You can't cover that up with another coat of diamond glaze. Thank god for flat back rhinestones. It's the one in the middle. http://viewmorepics.myspace.com/index.cfm?fuseaction=viewImage&friendID=76879029&albumID=1332446&imageID=38378659
These are all FABULOUS!!!
ReplyDeleteI fly in the face of rules. I use biscuit circle cutters to paint circles, I use other kitchen gadgets for modeling paste, paint, ink or whatever needs to be glopped, spread or smeared. I read directions carefully, then toss them aside and try it the way I think it ought to work ... I think it's all part of the creative process ... the scripted and unscripted and the results can jsut be amazing!
ReplyDeleteThe glass work that I do is considered unconventional. Most glass artists that make lampwork beads use rods of glass, usually Italian glass (read: expensive). It requires a myriad, plethora, pick a descriptor that means LOTS of different kinds of glass, and there you have most lampworkers.
ReplyDeleteThe lampwork I do is from scrap stained glass... The amazing diversity of glass that is available, that I rarely if ever have to mix colors (they come pre-mixed from the glass manufacturer), makes for a medium that is absolutely out of the ordinary - (there is a link to my website below – check out the “Gallery” for examples of my work). I use small pieces (NOT sections cut into strips to resemble rods) of glass for my work, mixing dichroic glass, opalescent, water glass, baroque, Tiffany, etc.
To put this into financial perspective, a single rod of Italian glass can run for $1 and UP from there, and you may get a couple beads. An average half inch round bead made from stained glass is about one square inch of glass. A single square foot of stained glass may retail for about $7. Do the math, a square foot of glass is 144 square inches – 144 beads – you want smaller beads with half the glass, that's 288 beads for the same $7.00! You can also use the stained glass to make stringers, latticino, millifiori, etc. – the diversity is astounding! It's also inexpensive, so you can experiment without breaking the bank!
If you have seen the beautiful swirled opalescent glass out there, imagine cutting it into small pieces -- one piece may have more blue and purple, another more purple and white, others a blend of all three. All the beads will be different, color-wise, but they ALL MATCH since they came from the same piece of glass! As well, the beads are sized consistently since the glass is limited to what was cut before the bead was made. Pretty cool, huh? Not many rod lampworkers can make the same claim.
It's also good for the environment in that you are recycling glass that was left over from making stained glass projects! Score!
Something else that takes the lampwork to another level of “different” altogether is the creation of Memorial Beads and Pendants. I take either animal or human cremated remains and embed these granules into lampworked pieces as sacred mementos of a loved one for the person to have close by. Here is a batch of beads that contain cremated remains of a friend's cat.
Cremain beads - http://tinyurl.com/dfobbl
I am always unconventional when it comes to my glass art. If I can't find the stained glass pieces I need, I fuse my own glass in a kiln and then cut it up for use in lampwork.
Does this make me an oddity in the glass world? I sure hope so!
Jim Adlhoch
Wild Wares Studio
www.wildwares.com
Gee Jim, now I won't have anything to write about when I "introduce" you! LOL! Awesome response!
ReplyDelete