Showing posts with label crafting. Show all posts

Tuesday, December 24, 2013

Gift Tags from Skelekitty, to YOU (free download!)

Are you still wrapping gifts?  Well, Skelekitty wants to help (so do I)!!  So, for the fourth year in a row, the FREE non-denominational Skelekitty gift tags/stickers (also great for non-holiday gift-giving) are available for download!  You don't even have to buy anything from me.  :)


Just click on the image you would like (yep, you can have both - nobody is keeping track).  Then, from my Flickr page, click "Download original size of this photo" to save the full sheet of tags to your computer.  Print them out, cut them and attach them to gifts (handmade, of course) and watch your friends as they squee with delight!

Positive Mid-Winter Celebratory Greetings and/or Happy 2014 to you all, however you acknowledge these cold and short days indoors.

Love,  Krissi and Skelekitty

Read more ...

Saturday, February 25, 2012

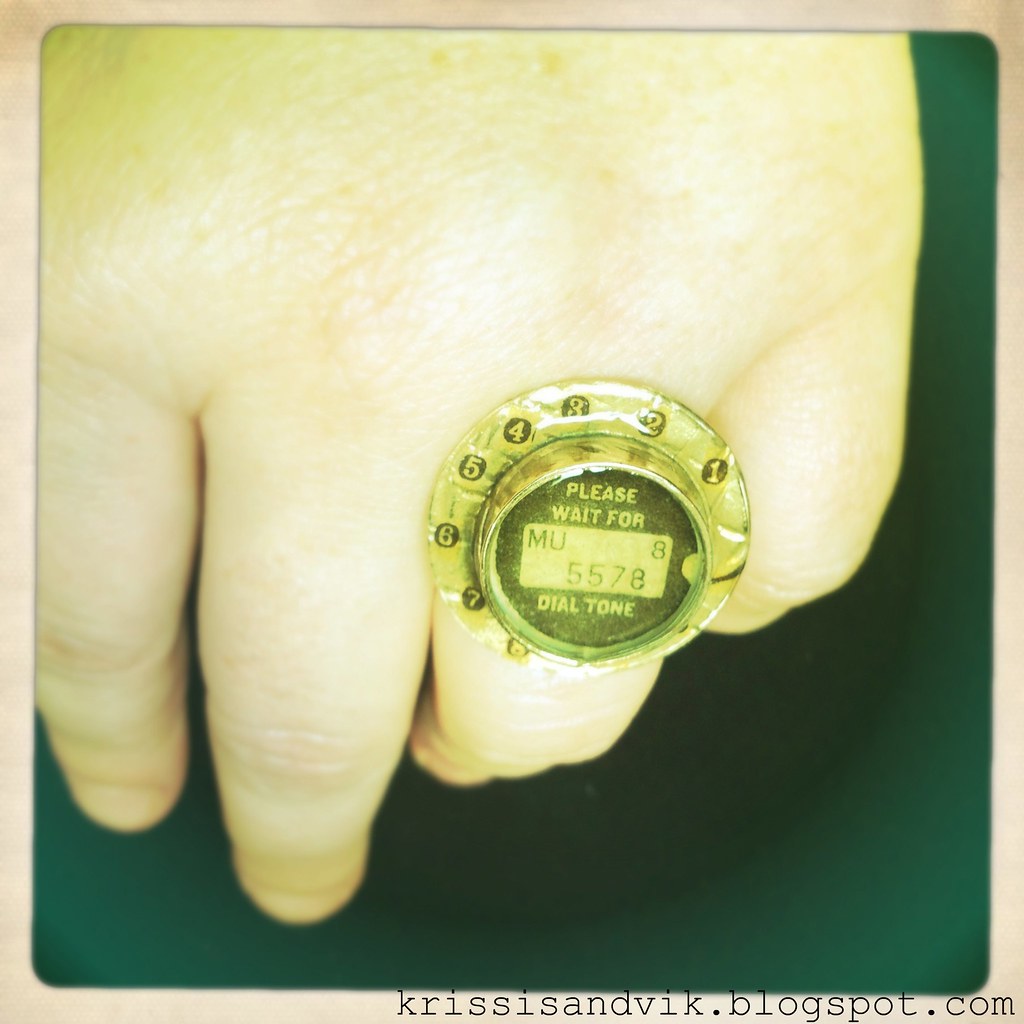
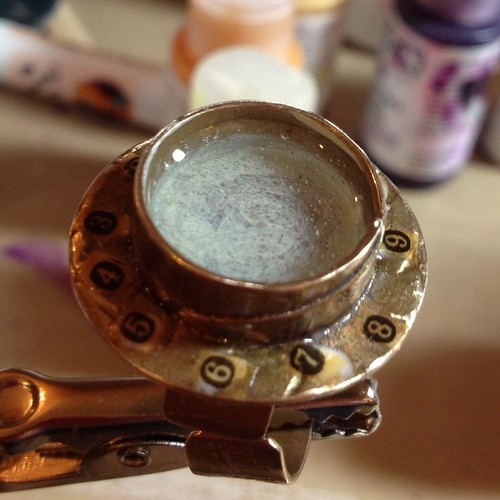
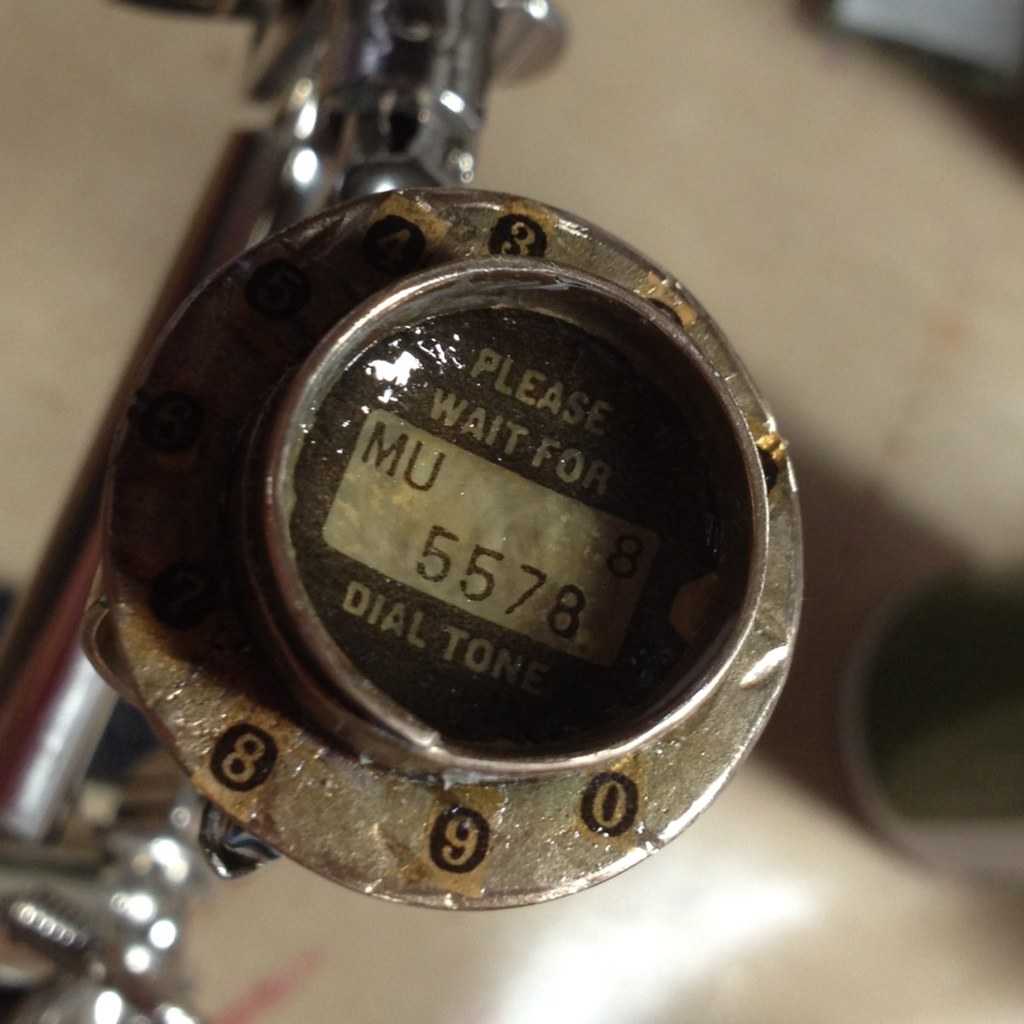
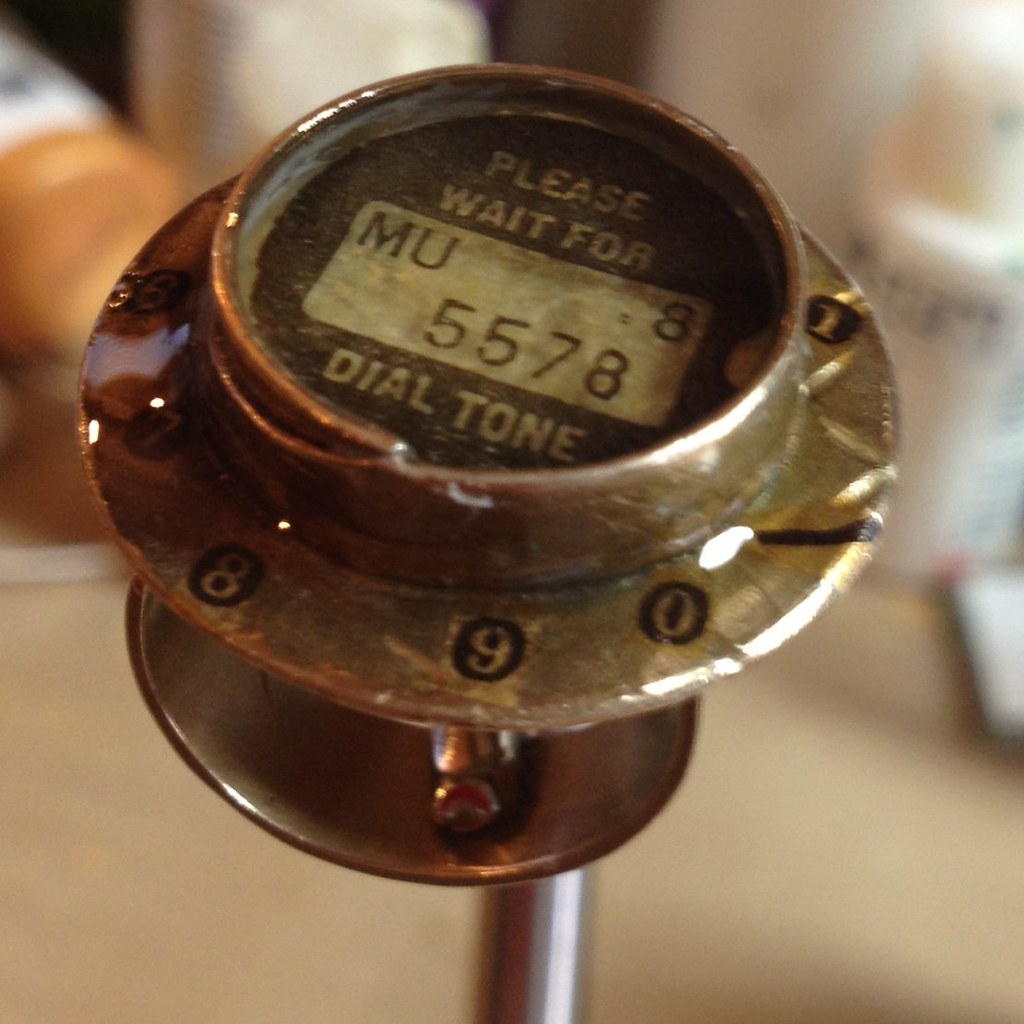
Telephone Ring (get it?) A Resin Tutorial

As I'm sure you all know, I do not fancy myself a jewelry designer by any stretch of the imagination, but I do love to make wearable mixed media art now and then.


When I started working with this ring blank from Susan Lenart Kazmer's Art Mechanique line, I intended to do layers of tissue paper, resin, rub on decals, watch gears and clear mica pieces, but once I started looking at the 7 Gypsies tissue paper I'd just purchased, the project took on a life of its own.

What you'll need for this project:
  • Ring blank - this one is the ring bezel in bronze from the Art Mechanique line by Susan Lenart Kazmer - the flange around the edge was an integral design element.
  • Numbers - I used 7 Gypsies Collage Tissue in "Numero", however, you can easily create your own numbers using a tape transfer technique and images of telephone dial numbers or old typewriter keys.
  • Resin.  I prefer 2-part jewelry grade epoxy resin with a 1:1 mix ratio like ICE or Luxe, both of which I use.  Make sure you have plenty of measuring cups and stir sticks.
  • Clear-drying adhesive or sealant/varnish
  • A steady hand  try practicing by playing some Operation with your little brother.
  • Tools:
    detail paintbrush or bamboo skewer
    sharp, small scissors
    something to hold your ring level
  • Acrylic craft paint (optional)
As always, start by opening all of your supplies and by cleaning your ring.  I just use a little 90% rubbing alcohol.

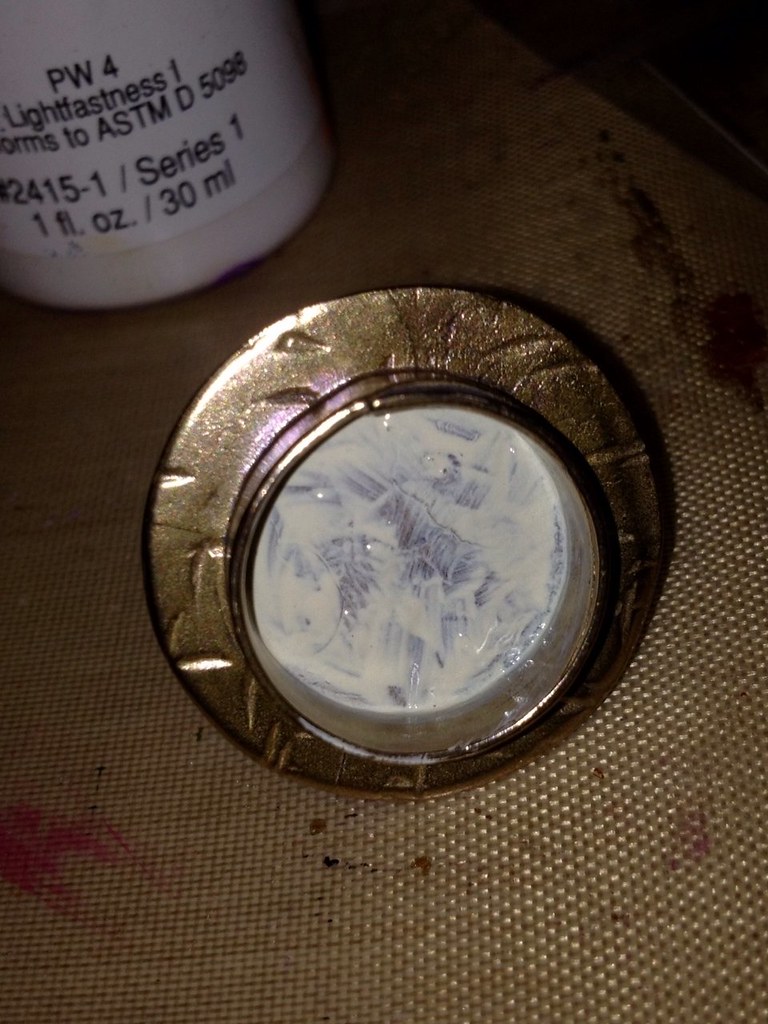
When you are working with a deep bezel in a bronze or dark color like this, layers will show up better if you start with a brighter background.  I just dabbed a little paint (I had Golden's Fluid Acrylics in Titan Buff on hand, but you can use any light colored acrylic craft or artist's paint).  

While you wait for the paint to dry...

Don't sneeze.


This was definitely the most difficult part of this project - cutting out the tissue paper and NOT blowing the teeny pieces across my worktable.  I used a very sharp pair of spring handled Fiskars snips, which made cutting the delicate tissue without tearing much easier. I think it was worth the effort though, because the sepia tone of the paper blends well with the bronze of the ring blank.  


Before we go crazy gluing things all over the place, let's take a look at an actual rotary phone.
Those of you under 30 probably didn't have one of these in your house.
magnifying glass is double plus good
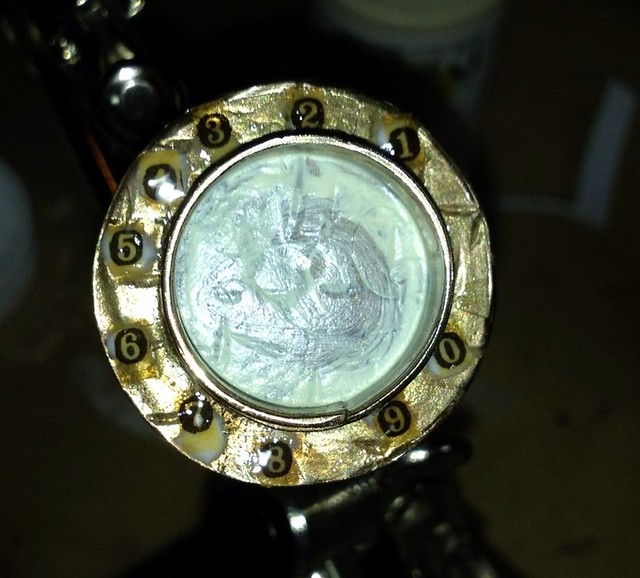
If you look at this like a clock, you'll see that the 3 and the 2 sit right on either side of 12 o'clock and the 8 and 9 sit, similarly, on either side of 6 o'clock.  I know you're already noticing that the 5 and 6 are right at 9 o'clock and the 4 and 7 sit in the space left between (the 1 and 0 just drop in line).

I started off at the top of the "dial" with some glue dots to mark where the 2 & 3 would go.  

I affixed the first two numbers (picking them up with a dampened/blotted detail brush) and tacking them down with some clear sealant - just enough to keep them from 'floating' around when I put down a layer of resin later.  Then I moved to the 5 & 6 and then the 8 & 9 before placing the other numbers.

By dotting clear sealant over the top instead of my usual silicone glue, the tissue paper took on a "wet" appearance and blended in with the bronze of the ring bezel even better.  

While the numbers dry, I'm going to bring the base of my bezel "up" by adding a layer of resin.  

But first, a word on using resin:

Mixing resin isn't as difficult (or as stinky) as it used to be, but there is definitely a trick to doing it well.  I always try to work on a dry day - cold and rain don't mean that I can't pour resin, but it makes it that much more tricky.  The MOST important rule - and it is a rule - is to follow the mixing ratio EXACTLY.  Resin is not something you can just eyeball.  It's best to mix an ounce at a time, but since I use resin in small amounts, it's not always cost effective.  However, the smaller your batch, the more perfect your measurements need to be.  

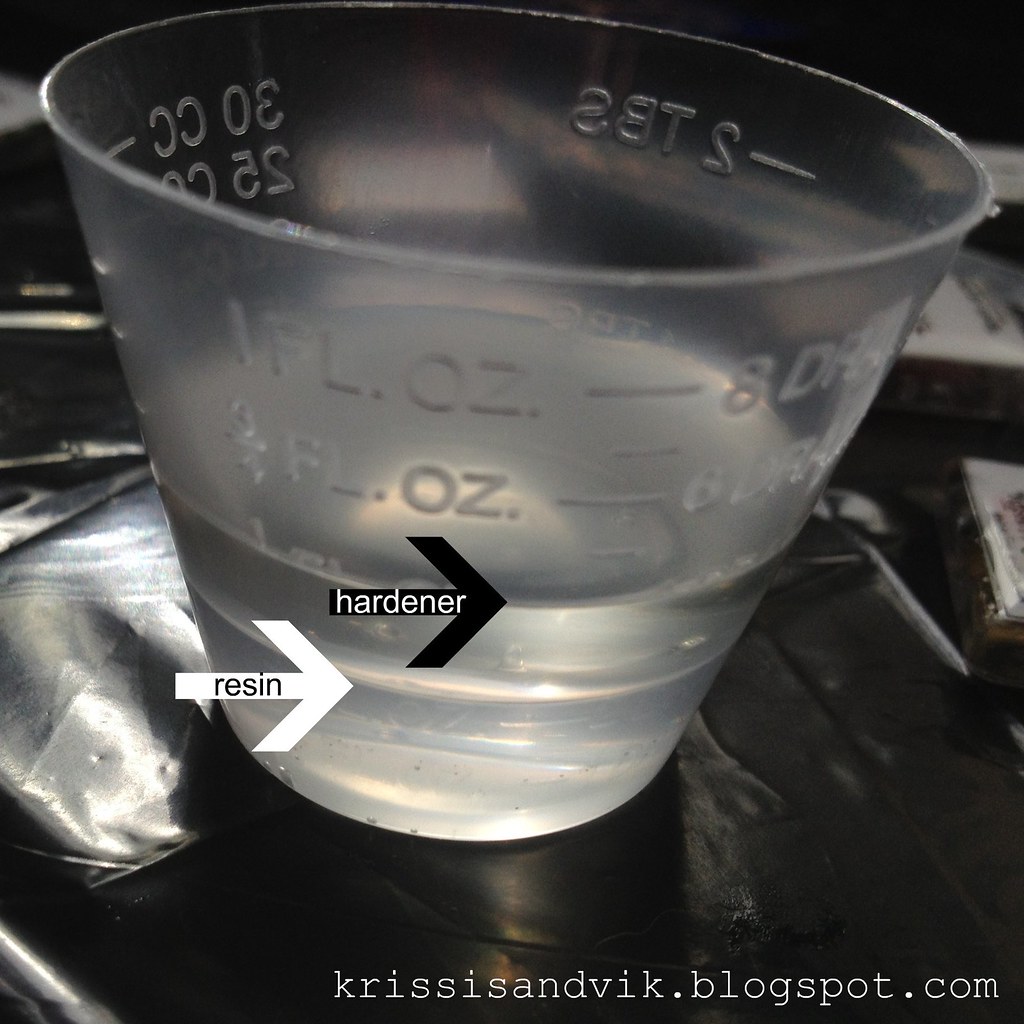
Add the resin first, adding drop by drop and letting the product level out between drops, until you reach your measurement exactly.  In this case, 2 drams or 1/4 fluid oz.

Add the hardener next, again adding drop by drop until you reach the correct proportion.  Since this resin has a a 1:1 ratio, I want EXACTLY 4 drams or 1/2 fluid oz.

Once you have your resin measured out, you can begin mixing.  I've found one of the best tools is a plastic palette knife - they're plentiful and easy to clean off with rubbing alcohol and a paper towel.  Unlike popsicle sticks, they are not porous and are not going to hold any humidity from the air (I learned this tip from jewelry designer Barbe SaintJohn, who uses a metal knife, and it has been a life saver).

I mix the two elements together by scraping the sides of the cup slowly and stirring gently for about a minute or so until the mixture turns from cloudy to clear.  I don't worry too much about bubbles, they usually work their way out before I get to the piece.  After mixing, I pour the resin into a clean mixing cup -a tip I learned from Annie Howes- being careful not to scrape the resin off the sides or bottom and screw up my nice homogeneous mixture.

At this point, you can release some of the bubbles by letting the resin rest for a minute, then tap the cup firmly on a table or other surface.  

For small pieces like this, I just drip the resin into the bezel using my (cleaned) palette knife - you can control the amount of resin much better than by pouring directly from the cup.

You'll have plenty of extra resin, so plan ahead to do something with it.  I coated some of my little handmade magnets with what I had left over from this batch.  

Let this cure on a level surface overnight before moving to the next step.


This little center piece, which just happened to be the same size as the bezel, is what changed the direction of this piece - I realized while I was dry fitting it the first time, that this would make a fun "telephone."

Like the numbers, I affixed this piece of tissue paper to keep it from rotating or curling when I apply resin later.  I used a clear sealant instead of glue - making sure that the unprinted portion of the tissue looked nice and evenly translucent.


I cut the tip off of a larger "5" to
create a dial stop.  Clever girl.
Once the sealant is dry, mix up another batch of resin and place your ring somewhere so the bottom is level.  You don't need a fancy fly-making rig like I have - just put a couple of popsicle sticks over a cup and place the ring on top.  Voila!

Apply some resin around the edge, over the numbers and out to the edge.  Next, use your palette knife to drip resin into the bezel.  You could repeat the layering process and add another element in at this point, but I decided to pour the resin right up to the top of the bezel so it will dome nicely.

You can also bring any bubbles to the surface with a heat gun on low or a hair dryer, but be careful, especially if you've filled the bezel to the top.  

Allow your piece to cure for 24 hours before you move it and 3 days before you wear or ship it. I won't be shipping this one anywhere.  I love it and am keeping it for my very own.

Crafty love,

Krissi

p.s.  Please ask questions if you have any in the comments here - if I don't know the answer, I'll find out or make something really convincing up.


Read more ...

Tuesday, December 20, 2011

Marketing Tidbit: Give Presents Just Because

Every now and then I like to make special items available for free.  From a marketing standpoint, it's good publicity.  From a human standpoint, it's just good.

So for the 2011 holiday season, I'm bringing back the FREE non-denominational Skelekitty gift tags/stickers!


Just click on the image you would like (yep, you can have both - nobody is keeping track).  Then, from my Flickr page, click "Download original size of this photo" to save the full sheet of tags to your computer.  Print them out, cut them and attach them to gifts (handmade, of course)!


Happy Hanukkah, Merry Christmas, Blessed Solstice, Happy Festivus and/or Positive Mid-Winter Celebratory Greetings to you all, however you acknowledge these cold and short days indoors.


Love, Krissi and Skelekitty


See all the Marketing Tidbits
Read more ...

Thursday, December 8, 2011

A Not-Really-A-Tutorial (Glass & Resin Jewelry)


"Inchie" pendant (1" square)
People ask me what procedure and techniques I use to make my glass tile and resin jewelry all the time.  The reason I haven't done a tutorial isn't that I am playing my pendants close to my chest, as it were.  It's just a super, duper involved process and I've never stopped to photograph each step as I go.

However, since this question has popped up again recently, I'll give you the 30-second version (sorry, no bunnies).


* print art and titles for backs (I use an Epson printer and Epson matte 27lb presentation paper)
* spray art with fixative
Seriously, the resin has to be
EXACTLY 50/50
* cut art and title pieces into itty bitty squares
*  glue art to glass tile (art faces glass tile)
*  glue title to back of art
*  seal title piece AND EDGES with silicone sealant
* wait for dry time
* clean edges of glass
* mix resin PERFECTLY
*  run resin around edges
* wait for set/cure time (overnight)
*  apply resin to entire back
If I do the resin all in one step, it "domes" and pulls away from
the edge, leaving a spot where moisture can seep under.
By running a bead of resin around the edge, allowing
it cure and then applying to the back, the art is fully protected
(but I still don't recommend you shower or swim while wearing your jewelry!)
*  stare at pieces for 48 hours to a week, depending on temperature and humidity
* quality check (toss or send back to "resin edges" stage)
* clean and polish
*  glue on bail
*  package in box with chain, care instructions and goodies
*  pack
* mail
*  pray that the USPS comes through

fin

Read more ...

Tuesday, December 6, 2011

Yesterday's Progress - photo blog (is that, like, a "flog?")

Well, first:

This doesn't look like the results of an entire afternoon of printing,
 sealing and trimming, but it is.  Next step,
what I do best: "gluing shit to other shit."
OK.  Now I have glass tiles with little
pictures glued to them.
Here's what they look like dry - these still need the backs glued on
and then have the sides and back sealed with resin

These are all finished - they just need final polishing and bails, then
they'll be going to new homes (or joining me at Art Bazaar & Bizarre Art in
Midtown Sacramento on Saturday night!)

But then:
Hey!  This is new!  1" rings!
So you take your glass tile with awesome art glued to the back...
... and you pop it in (with the help of a little E6000 adhesive).
These little goodies will be premiering on at Art Bazaar & Bizarre Art
on December 10th (5-8pm) in Midtown Sacrament OR you can order
them from my ArtFire shop (contact me for a custom listing for now).

And just because:
YAY!!!! HANK IS HOME!

Read more ...

Friday, October 28, 2011

Sugar Skull Mask Tutorial!! Woo Hoo!

A little over a week ago, I was lamenting the loss of my muse on Facebook and Google+ in the hopes that someone would say something to spark my imagination. Most of my artist friends were also dealing with creative blocks, so we figured that our muses all took off with the 'blue flu' (or whatever prompts inspirational goddesses to go AWOL for a day).

Luckily for me, my friend Betty called me with a request and challenge.  Could I make her five Día de los Muertos style sugar skull masks.  *LIGHT BULB!* I sure could!


My friend and hairdresser, Betty, and I talk about Mexican folk art and culture constantly.  Her heritage is Mexican, while I first became enamored with all things Mexico when I lived in San Francisco's Mission District, a vibrant neighborhood with a large Latino population. I really love Day of the Dead, which mixes both Aztec and Spanish beliefs and cultures into something new and wonderful. This holiday particularly appealed to me as it focuses on death as a part of life and not as something to be feared.  Well this year, Betty is teaching a series of classes (she teaches for Paul Mitchell) with a hair/fashion show.  In Mexico City. On Dia de los Muertos, and she asked me to make some sugar skull masks for the models!  Woo hoo! Here's how YOU can make them too:

You will need:
  • Mask - plastic, Papier-mâché, or even ceramic if you are creating a wall decoration
  • Rubbing alcohol
  • Glue - choose one that is appropriate to the substrate of your mask
  • GLITTER! - lots of it in lots of colors!   You can use just about any type of glitter (loose or glitter-glue).  DO NOT USE antique German glass glitter or any glitter made of glass.  It will be near your face (and eyes), so let's not go blind, m'kay?
  • Paintbrushes for glue, water, toothpicks, paper towels, fluffy paintbrush for brushing away loose glitter
Optional supplies:
  • Plastic primer
  • Clear/white glitter spray (I didn't use this, but will point out where you could)
  • Glitter tray or folded paper to return loose glitter to jars
  • Dryer sheets <--- secret weapon when using glitter!
Betty chose some 1/2 face 'Phantom of the Opera' style masks, but you could use eye masks or full face masks if you prefer.  You could use plastic, papier mache, fabric masks or even ceramic ones for a cool wall hanging.

primer
unprimed mask (left) and mask with adhesion
promoter and matte white primer (right)
1.  Remove the elastics and set them aside, then clean the masks with some rubbing alcohol to remove any residue or fingerprints.

1a.  OPTIONAL STEP - skip if you just need the mask for one night.  Since these masks will be packed and taken with Betty to Mexico, I chose to prep my masks to ensure the best contact between the products and the mask.  I started with an adhesion promoter for plastics (from the auto section of my local hardware store) and then added a layer of matte white primer for plastics (don't use gloss or you'll be back where you started).

blackbase1b. OPTIONAL STEP: You could spray your entire mask with clear glitter spray at this point to give the entire face a "sugary" look!

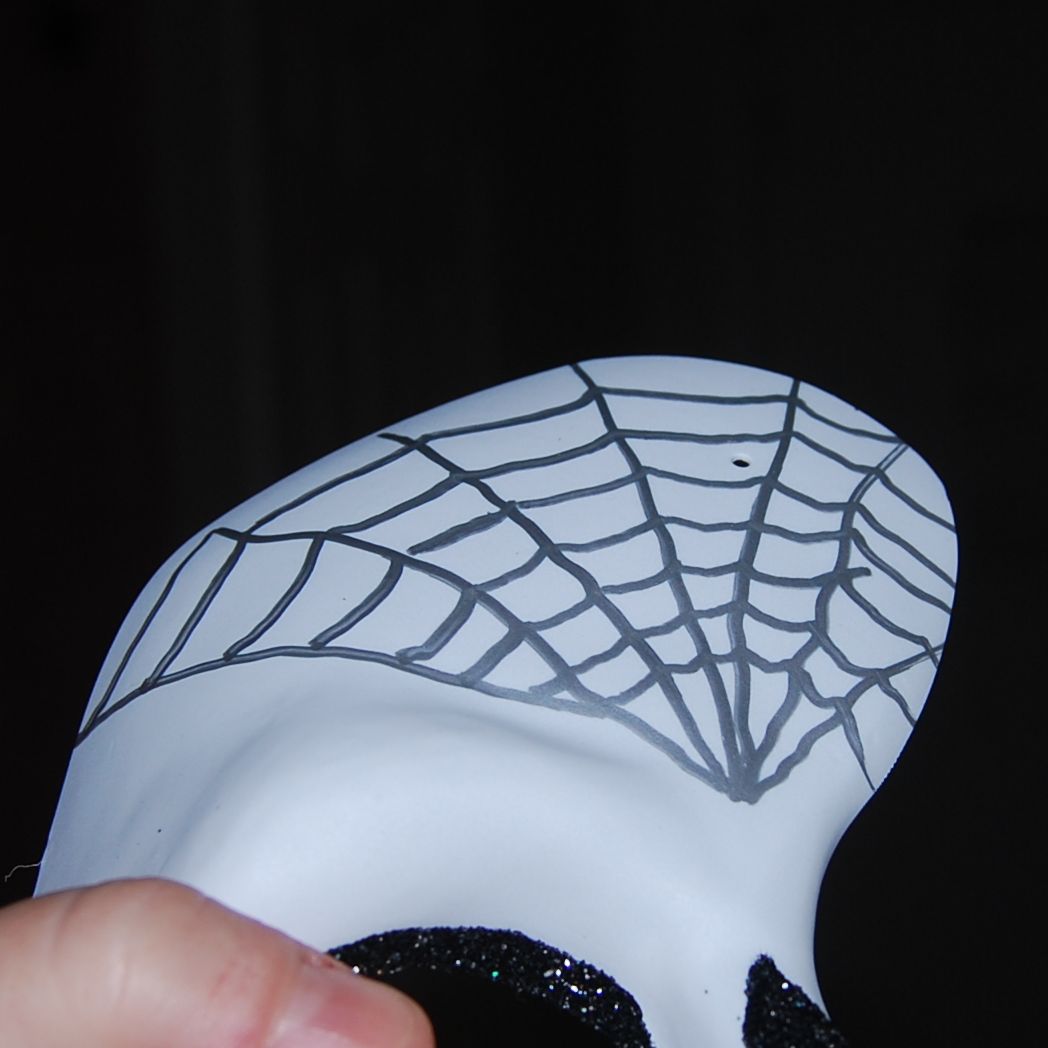
2.  Paint or sketch an outline of the shapes you want to create.  Painting your shapes first helps to make sure the glue goes where you want (working with white glue on a white mask is a bit confusing).  Also, pre-painting helps to prevent the white from peeking through the spaces in the glitter, I painted the nose and around the eyes with black paint (I tried at first with sharpies, but they were a bit trickier on the "topography" of the mask - a brush is more forgiving).

IMPORTANT TIPS! 
  • If using loose glitter and glitter glue, START WITH LOOSE GLITTER first
  • WORK FROM DARK TO LIGHT COLORS!  It's much easier to get a grain or two of yellow out of your black sections than to get black out of your yellow, etc.  Trust me on this one.

glue3.  Brush your glue over the DRY painted area (a brush gives you more control and precision than squeezing from the bottle).  I chose a flexible fabric glue for gems and beads, because I expect the masks to flex a bit during travel.  Most people would get great results just using a good quality white craft glue.

IMPORTANT TIP!  WORK WITH ONE COLOR OF LOOSE GLITTER AT A TIME.  Don't paint glue on for more than one color of glitter.


4.  Pour that glitter on!

Crafty Chica Be-Bob Black glitter
by Duncan Crafts
Tips - using a glitter funnel/tray is very helpful (mine is a Tidy Tray which I scored for a few bucks at a craft show), but if you don't have one, you can use a piece of paper, folded in the center to return unused glitter to the bottle.  Want another tip?  Rub a dryer sheet over the surface of your funnel tray or paper before sprinkling glitter - it will keep the glitter from sticking and return more to the bottle for you to use later!

5.  Repeat for each color of loose glitter.
pattern traced with a silver Sharpie
Glue painted over spiderweb pattern
Pour that glitter!
This is Tulip (by Duncan) superfine holographic silver washable glitter.
I could NOT live without this product.


6.  Did you miss a spot?  No worries!  Just pick up some glue on a toothpick or bamboo skewer and fill in the blank spots, then add more glitter.
I love bamboo skewers and keep them in my craft drawer at all times.
This glitter is Crafty Chica's Pop Star Purple by Duncan
Let the loose glitter set/dry between layers OR if using glitter glue next, you can move on immediately.

8.  When you re finished with your loose glitter application for the day, you can start applying glitter glues.
I love glitter glues and swear by Ranger's "Stickles" glitters;
while the bottles are small, they last a long time and are very fine
 and acid-free.  You can find them at most crafting or scrapbooking shops.
Sometimes I like to blend colors together, like the yellow, orange and red in the flames.
Once again, toothpicks and bamboo skewers are VERY helpful!  Just run them back and forth in the glitter and you end up with an artsy fartsy look.

9.  After everything dries (I let it dry overnight), brush off the loose glitter with a fluffy paintbrush.

10.  If you like, you can add some silk or crepe paper flowers.  I attached these with a little hot glue and some E6000 (because they were traveling to Mexico - yours will be fine if you use hot glue).
A few flowers from the Dollar Store and a plastic skull from the Halloween section at my local craft shop!
Leaves and flowers from the Dollar Store, and a plastic skull bead glued to a butterfly from my local craft store.


THAT'S IT!  Now you can just reattach your elastics and rock the party!

Let me know if you have any questions - I'm happy to answer them here.

Read more ...

Tuesday, September 27, 2011

Marketing Tidbit: Make 'Em Put A Ring On It

Winter art and craft festival time is FAST approaching, so this little tip is for those of you gearing up for the crazy weekends to come.

You've probably been there - you're at a festival or art/craft fair and a customer asks you to hold an item, ostensibly to find their husband/wife/holder of money.  You want to make the sale, but you know there's a very good chance of them never returning. Festival-induced ADD is the main reasons I would never hold items for people.  There's nothing more frustrating than turning down the next customer who wants that item - except maybe being the next customer who is turned away! Chances are you won't be seeing them again, either.  

My new-found collague, Kattaztrophe Arts' has a simple, but brilliant solution:  include a small deposit in your hold policy.   Base it on a small percentage of the price of the item, which is refunded/applied toward the final cost.  With a deposit in your coffers, you don't completely lose out if the person doesn't return.  I think you'll find that anyone who refuses to pay a deposit wasn't really interested and those who do will come back more times than not.  If they don't have cash on them and they really want the item, they'll move pretty quickly to find their other half!

Here are some extra Krissi-tips on the side:
  • post your hold policy and deposit requirement (with amount or %) - never make people ask
  • remove any item on hold from public display immediately (don't tease customers with what they can't have) 
  • keep order forms on hand and have a proper system for accepting customer orders (with payment or a deposit, of course)

Read more ...

Tuesday, September 20, 2011

Marketing Tidbit: Play A Little

Have some fun with your customers - invite them over to play once in a while.  Laugh a little.  There doesn't need to be a payoff, a prize or a giveaway for them every time they come to visit.  Sometimes, it's enough just to hang out with you and goof off for a while.


Halloween-themed free downloadable coloring page
from Kittycrossbones over on Facebook
for you, your kids, your friends, whatever

Some marketing isn't going to have an immediate and direct effect on your bottom line, but it does build up your likeability, which is a huge part of what handmade is all about.  Besides, even if nothing comes of your evil plan for world domination through free coloring pages, it's worth doing for the smiles.
Read more ...

Saturday, July 17, 2010

Revel in your Geekocity!

I understand there is now an "Embrace your Inner Geek" day (July 13th).

OK.  Fair enough....

But in all honesty, I'm not sure I HAVE an inner geek - I think everything geeky and dorky is pretty much out there for all to see.  I mean, I open my mouth and I'm sure people mentally label me DORK! within the first 2.25 minutes.  Maybe less.  I was called an egghead in college for reading Hamlet instead of watching the Superbowl but I figured I didn't go all the way to Oxford, England to do stuff I didn't like when I was in the US!

Of course, there are some who mistakenly label me cool, but I can say with some assurance that they're just as much of a doofus as I am and it is actually an attempt to reconcile their own feelings of being a complete and utter goober with the need to relate.  The cool label also comes from those who have their geek buried  deep within and are not giving it the hugs that it needs.  Heck, they may not even know it's there.

Of course, the worst label we geeks get isn't a word, it's a tone of voice.  Anger.  These people have no geek in them  and, fearing what they do not know, make fun of it - this geekless state is such a frightening concept that I dare not explore it any further.  I liken it to not having a soul.  ::shudder::

Anyway, no matter where your personal geek resides, find it and give it a hug.  And maybe a cupcake.  With sprinkles.

Now go make one of these:
River Song's book of spoilers, aka the TARDIS/time travel diary
Here.  I'll show you how.

Read more ...

Monday, March 22, 2010

OMG! How Did I NOT Know This Existed???

Did you (or perhaps your brother) build models when you were a kid?  Remember the super cool "water slide" decals that you used to put the Union colors on your Sopwith Camel?  (Oh, tidbit o' info, the British flag is only the "Union Jack" at sea - at all other times, it is the "Union Flag.")

Well, now you can make your OWN water slide decals at home without any special sign making equipment.  All you need is an inkjet printer, a paper-backed film made for just such a purpose and some clear spray paint.  I found this amazing little piece of information while researching a DIY tutorial for customizing car "roundel" badges.  Chad used some sandpaper, elbow grease, primer and the decals to turn these:

into these!

As soon as my replacement roundels arrive (I found the oddly sized ones for the Z4 MC at Bavarian Autosport, but the two fender badges are on backorder for a couple weeks), I will be making custom badges for the new Skele-mobile.  Imagine, if you will, this photo replacing the usual blue & white logo badges:

YEAH, BABY!

OK, so I probably already knew that inkjet water-slide decal paper existed, but never actually saw it in any of my art/craft supply stores and none of my crafty friends introduced me to it.  So off I went to the link Chad provided on his tutorial to purchase some of the paper backed printer film and found some other goodies that were so awesome, that I almost fell out of my chair!

Temporary tattoo paper

Yeah, I know, this has been around forever too, but now you aren't just stuck with whatever flash-type tattoos get passed out at county fairs.  You can turn your own art into temporary tattoos!  Soon I can turn out new Skelekitty designs as temporary tattoos like *snap* that.  I plan to give these these out as freebies at art shows, for inclusion art and print orders and application to my local 'tween fans, and seriously, how much fun is that?


Rub on decal paper

Anyone who has scrapbooked or done even a small amount of mixed-media or collage projects has used or at least seen rub on decals.  They have nearly invisible edges (not like clear stickers or tape transfers), are easy to find in your local craft supply store and come in some really wonderful colors and intricate designs.

But what if you want to add text or an image you can't find?  Well, sure, you could go the tape transfer route, but what if you don't have a laser printer or access to a photocopier for a nice crisp transfer?  Well, you could print onto a clean transparency and then use it like a rub on, but again, the transfer isn't perfectly crisp.  Enter dry rub-on transfer paper which you can find in all kinds of online shops (there is also a line created specifically for use on wood!).  The only drawback of making your own over purchasing them from the stores (besides the obvious copyright issues) is that you can't make them in white.  Still...!  I'm looking forward to using it for adding custom text to my art projects.

Again, there are lots of companies in the US, Canada and the UK which offer these products.  I'm sure you can even buy them from some local print specialty shops.  When my orders arrive, I'll play around and post some tips on using them.

Enjoy!  Krissi

Have you created your own tattoos, stickers, rub-ons or auto decals?  Send me a link to your tutorial and I'll post it!
Read more ...